1 cup Baking soda
1/2 cup Citric acid
1/2 cup corn starch
2-1/2 tablespoons oil ( I use a combo of grapeseed and almond, but you can use any liquid oils)
3/4 tablespoon Water
2 teaspoons essential or fragrance oils
1/2 teaspoon Borax
Spray bottle filled with Witch hazel
Mix the baking soda, citric acid and corn starch until well blended.
In a separate bowl combine cooking oil, water, essential oil, and borax. Mix well. Drizzle wet ingredients into the dry ingredients, pouring with one hand and squishing it together with the other.
Pack into candy or soap molds. I use a circular 2 oz. soap mold with a flower pattern on the top (it's tooooo hard to unmold anything with squared corners). Pack it in really hard, then immediately flip it over and tap it out onto a lined cookie sheet. When all are done, lightly mist with witch hazel and let dry overnight.
Next day, turn over and mist the bottoms with witch hazel. Let dry another day. The witch hazel forms a crust on the outside that keeps them from cracking and falling apart, although they're still a little fragile. Don't make them when it's damp outside, high humidity makes it much harder to do.
Thursday, 2 September 2010
Basic Bath Bomb Ingredients.
Gather your ingredients:

• Witch hazel
• Coloring of your choice
• Fragrance oil of your choice
• Dome Shaped Mold
 BLEND BLEND BLEND BLEND the citric acid and baking soda – this step is super important – if you don’t blend well, you end up with a grainy bomb. We actually use a mixer on our larger batches.
 Once you’ve blended really well, add your colorant. Dry pigments or a specialty bath fizzy colorant like La Bombes work best – don’t add too much though – the color shows up once you add the witch hazel.
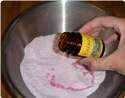 Add fragrance oils to your personal nose preference.
 Now, this is the difficult part. Spritz (with a squirt bottle) the witch hazel onto your batch while stirring with the other hand. When your batch sticks together when squished, you need to start putting it in molds – time is of the essence. If you wait too long, the mixture will get hard. If you spritz too much, the mixture will be too wet and “grow” (start the fizzing reaction) on you.
 Put the bombs in molds – wait a few minutes and tap them out. Let them air dry for 3 or 4 hours and voila! Wonderful, hard bath bombs. The harder you pack the bath bombs, the more dense, heavy, and durable bomb you will get.

• 1 part citric acid
• 2 parts baking soda
• Coloring of your choice
• Fragrance oil of your choice
• Dome Shaped Mold
 BLEND BLEND BLEND BLEND the citric acid and baking soda – this step is super important – if you don’t blend well, you end up with a grainy bomb. We actually use a mixer on our larger batches.
 Once you’ve blended really well, add your colorant. Dry pigments or a specialty bath fizzy colorant like La Bombes work best – don’t add too much though – the color shows up once you add the witch hazel.
 Add fragrance oils to your personal nose preference.
 Now, this is the difficult part. Spritz (with a squirt bottle) the witch hazel onto your batch while stirring with the other hand. When your batch sticks together when squished, you need to start putting it in molds – time is of the essence. If you wait too long, the mixture will get hard. If you spritz too much, the mixture will be too wet and “grow” (start the fizzing reaction) on you.
 Put the bombs in molds – wait a few minutes and tap them out. Let them air dry for 3 or 4 hours and voila! Wonderful, hard bath bombs. The harder you pack the bath bombs, the more dense, heavy, and durable bomb you will get.
 These fragrant spheres for the bath (we scented ours with peppermint oil) are made by packing Epsom salts into a plastic mold. The bath "snowballs" can be tinted any color. You'll need 3 to 4 days to make the bath balls because of the drying time between steps. Makes 2 large or 4 small balls.
Tools and Materials
2 cups Epsom salts
2 tablespoons water
A few drops essential oil(s)
1 drop food coloring, plus more if desired
Special equipment: plastic pipette, large or small round bath-ball molds, storage jars
Directions
1. Stir together Epsom salts and water in a mixing bowl. Using pipette, add oil, 1 drop at a time, until strength of scent is to your liking. Add food coloring, 1 drop at a time, until desired shade is achieved; stir until color is even throughout.
2. Spoon a generous amount of mixture (more than necessary) into 1/2 of a bath-ball mold. Pack firmly. Repeat, packing mixture into second half of mold. Press pieces together until they connect. Remove top half of mold very carefully. Let bath ball stand, mold side down, overnight (set ball on an overturned jar lid to keep it from tipping over).
3. Remove mold carefully. Invert, and let ball dry completely, 2 to 3 days more. Transfer to jars.
Gift-Packaging Idea
Use a glass kitchen canister to present the bath balls, which the recipient can then display on a vanity. Wrap the jar with ribbon, tying a bow at the top, and add a vellum gift tag threaded with cord in a matching color.
Source: http://www.marthastewart.com/article/natural-beauties-bath-snowballs
Subscribe to:
Comments (Atom)